Article is devoted to a question of a correct understanding of new estimating measurements which are actual now is connected with introduction of the international normative documents concerning the concept «uncertainty of measurements», its role in metrological practice and relations to the concept «error of measurements». The problem of an objective assessment of measuring results are caused by creation of more and more difficult physical and mathematical models of real measuring objects. Historical information of origin of «the concept of uncertainty» is done, the question of introduction of «uncertainty» in metrological practice as a performance of uniform international metrological works is considered, and also on a comparative basis for the short analysis of concepts of error/uncertainty of measurements is given.
Keywords: international standardization, uncertainty of measurements, error of measurements, World Trade Organization, unity of measurements, Management, measurement, concept of accuracy, accuracy assessment, result of measurement.
With the entrance of Russian Federation into the World Trade Organization (WTO) in 2012 the Russian metrological school had a difficulty of the correct understanding of new concepts of measurements within the international standardization. Measuring tasks of the description of real objects through parameters of its model is considerably becoming complicated that entailed creation and more difficult physical and mathematical models. It is necessary to improve national regulatory basis which is actual as available achievements in the field of metrology today.
It is wider than normative documents in which results of measurements are described in the concept of «uncertainty», but it is not «error» of measurements in practice of metrological works.
For the first time the term «uncertainty» as a synonym of the term «error» was applied by the German physicist-theorist Verner Heisenberg in 1927 in his widely known article «About the Evident Maintenance of Quantum and Theoretical Kinematics and Mechanics».
The concept of «uncertainty» of measurements gained wider circulation at the end of the last century in 1978. The international committee of measures and scales (MKMV) addressed to the International bureau of measures and scales (MBMV) with a request to consider a problem of standardization of quality estimation of measurements and together with national metrological laboratories to develop the generalizing document which received the name Recommendation of INC-1 «Expression of Experimental Uncertainty " subsequently, was finally approved in 1986.
In 1992 the international organization for standardization (ISO), having created the Technical TAG 4 WG 3 Working Group, I that received the task " to develop the leading document which is based on Recommendations of the BIPM working group to drawing up the report about the uncertainty and it contained rules of expression of measurements uncertainty and it would be used by standardization services, calibration, accreditation of laboratories and metrology» [1].
The objective was realized in the form of «The guide to expression of measurements uncertainty ", known as GUM (from English The Guide to the Expression of Uncertainty in Measurement) developed by the following international organizations: The International Bureau of Measures and Scales (BIPM), the International Electro technical Commission (IEC), the International Federation of Clinical Chemistry (IFCC), the International Organization for Standardization (ISO), the International Union in Pure and Applied Chemistry (IUPAC), the International Union on Pure and Applied Physics (IUPAP), the International Organization of Legislative Metrology (OIML). In the subsequent editions of the Management in 1995 and 2008 all mentioned organizations put the logos [2] on its title page, having designated the official approval and claims for copyright concerning this document.
Emergence of GUM evoked a wide response in the environment of Russian metrology as assumed replacement of a classical way of results measurements description and unusual terminology introduction.
When we say about uncertainty of measurements, the international standardization of accuracy and quality estimation of measurements is meant, i.e. the same as last century for the best understanding of metrology of the different countries of each other it was required to standardize system of size units, at a certain stage of development it was required to standardize also estimation quality procedure of measurements. This process began with checking standards of the sizes of the same name when it was found out that values of units of the sizes reproduced by these standards, and the values of errors attributed to them sometimes weren't even crossed with each other. The reason of such divergences was that everyone in the country can estimate an error in his own way.
It is known that domestic metrology as the measurements accuracy description operate with concept the error. Thus, the new term «uncertainty» was used in GUM approach which was perceived by them as replacement of usual «error» being characteristic (measure) of measurement accuracy.
The simple and logical concept of accuracy, at the end of the last century appeared in a number of foreign countries began to be exposed to criticism. The term «error» was the main reason for a dissatisfaction. Unlike Russian, in English and French of concept «mistake» (i.e. the miscalculation, incorrect action) and «error» don't differ (the «error» in English, «erreur» in French). For this reason metrological terminology was in a conflict with the generally recognized ideology of quality management of goods and services on the basis of the ISO standards of series 9000. The essence of this methodology consists in providing conditions for faultless performance of all production functions and operations. Therefore an ideal picture of production errors of measurements (in Russian − spoil the errors making a few other sense) which, unlike usual mistakes are to be avoided as they are inevitable consequences of limited opportunities of measuring equipment and accompany each measurement.
Now the Management ofGUM got practically the status of the international regulations obligatory to application. It is aimed, first, at providing us with full information on all components of measurements error results and, secondly, at the international standardization of measurement reports and their accuracy assessment, for the purpose of a basis formation for the international comparison of measurement results. Thus it is meant that the world unity in methods of accuracy an assessment of measurements will provide the correct use of measurement results in all spheres of activity. The concept uncertainty was used in the Management of GUM being basic concepts of the classical theory of accuracy: «true value», «the valid value» and «a measurement error» aren't used. The concept measurement uncertainty is understood as doubt, incomplete knowledge of value of the measured size after carrying out measurements and as the quantitative description of this incomplete value is superseded.
Uncertainty of measurements is the parameter connected with result of measurements and characterizing value dispersion which could be reasonably attributed to the measured size [3].
The concept «uncertainty» came from English it means «uncertainty». First letter U means designation of this parameter. Uncertainty reflects lack of true value of measured size y and adding a hint of doubt in that, how precisely the result of measurement u presents to Y. According to it, the result of measurement can be expressed by the following formula:
Y=y ± U, p=0,95 (1)
From expression it is visible that the probable dispersion of values Y is in range ±U to the result of measurement y, degree of finding validity of Yv values this interval is defined by probability (trust level) p=0,95 [4].
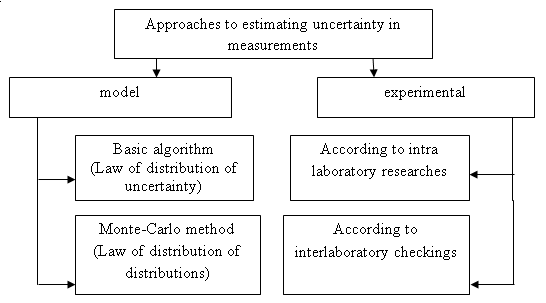
In an uncertainty assessment in measurements there are two approaches (figure 1).
Basic provisions of the concept of uncertainty are reduced to the following:
1) All components of uncertainty can be grouped in two categories according to their estimation way:
A — the components are estimated by application of statistical methods (processing of results of repeated measurements);
B — the components are estimated in a different way (according to the characteristics taken from the passport of the device, techniques of performance of measurements from reference books, etc.).
In mathematical statistics are two types of the parameters characterizing dispersion of uncorrelated random variables known: as quadratic deviation (SSQD) and confidential interval. They are also accepted as characteristics of uncertainty with names standard uncertainty (the uncertainty of result of measurements expressed as the average quadratic deviation (AQD) and expanded uncertainty (the size defining an interval round result of measurements within which as it is possible to expect, there is a most part of distribution of values having sufficient basis that could be attributed to the measured size).
2) Components of type A are estimated as standard uncertainty (news agencies) is equal to mean square deviations (SKO) of arithmetic averages of repeated supervision. These components are characterized by numbers of freedom degrees of vA = n-1, where n — number of supervision.

Fig. 1. Approaches of estimating uncertainty in measurements
3) Components of type B (willows) are estimated as the standard (mean square) deviations received from known borders in which there can be values of the measured sizes. These components are characterized by numbers of freedom degrees of vB = ∞5.
4) All components form total standard uncertainty иС which is calculated by the rule of summation of dispersions.
5) An interval assessment of uncertainty is expanded by uncertainty which is received by multiplication of standard total uncertainty by coverage coefficient.
At the indication of expanded uncertainty specify the level of trust of river. According to MRA and ISOIEC 17025 this probability is accepted equal 0,95.
Summarizing all above said, we come to a conclusion that standard uncertainty is analog of SKO as error of measurements, and as expanded uncertainty — full analog of confidential borders of an error measurement. And in all concept of uncertainty was closed with a traditional definition problem of accuracy measurement estimation.
Thus, regarding practical applications the new concept of estimation of measurement accuracy was almost identical to classical type. Besides, these concepts are closely connected with each other. As to differences, they consist in the size of referring characterizing dispersion of observed values. At classical approach it is carried to true value of the measured size X, in other case — to result of measurements of y. But this distinction doesn't influence on final results as and in classical approach of error measurements are attributed to result of measurements. The management and the conceptual model of uncertainty is based on this Management enter uniform procedure of processing measuring data — both for unique metrological, and for mass technical measurements. Unification is always simplification, and in this sense the Management can't replace the analysis of errors in full, and belongs only to expression and providing measurement accuracy. Thus, the concepts «error» and «uncertainty» can be harmoniously used without their mutual opposition.
The era of the global market points a task of ensuring unity of measurements on a large scale: methods of result measurement assessment and uncertainty expression have to be globally uniform. The delay of introduction of uncertainty into the Russian metrological practice will lead to violation of uniform approach in understanding and use of measurement results in science, equipment, industry and trade at the international level.
Thus, improvement of domestic regulatory base within the concept of the uncertainty is approved by the international metrological community as an actual task of development and specification of this new model at the physical and mathematical levels of modeling universal introduction in practice and carrying out measurements by the Russian scientists.
References:
1. Guide to expression of uncertainty of measurements. The lane with English — St.-Petersburg: VNIIM of D. I. Mendeleyev, 1999–126 p.
2. JCGM 100:2008 Evaluation of measurement data — Guide to the expression of uncertainty in measurement. -Geneva, 2008.-32p
3. RMG 43–2001. Recommendations of GSI. Use of «Guide to expression of uncertainty of measurements». St.-Petersburg: VNIIM and. D. I. Mendeleyeva, 1999–26 p.
4. Zakharov I. P. Uncertainty of measurements for teapots and … chiefs: manual. -Kharkov, 2013–56 p.


